Posted by ZUL8TR, Apr 17, 2011 at 5:21 pm
So how come I finally get around to removing a few minor emission pieces and the Feds and State gov'ts decide testing is a viable thing in IN? I should note, I did not get rid of the CAT. Its with the car, on the shelf beside it, keeping the car cozy and safe.
Oh well, at least I planned for this with my design. I'll just wait and see what happens before I 'adjust' to any new gov't regs.
Oh well, at least I planned for this with my design. I'll just wait and see what happens before I 'adjust' to any new gov't regs.
Posted by ZUL8TR, Apr 17, 2011 at 5:16 pm
After a morning of TRYING to work on the truck and then the Z and failing at everything I tried, I decided the Car Gods did not want me to touch a motor vehicle today. Instead, I spent the day watching racing on TV.
Maybe Wednesday will be a car day.
Maybe Wednesday will be a car day.
Posted by ZUL8TR, Apr 15, 2011 at 4:49 pm
Thanks. Its been long, fun, frustrating and very fulfilling.
Posted by ZUL8TR, Apr 15, 2011 at 6:01 am
Off to Lowes to get some CLEAR tubing to siphon the gas. I have an old garden hose I could use, but clear tubing will let me see the gas before I end up with a mouthful of it.
Posted by ZUL8TR, Apr 14, 2011 at 5:34 pm
DC33 wrote
fuck this thing is taking forever
yea, but its looking pretty good, huh?
Posted by ZUL8TR, Apr 14, 2011 at 5:33 pm
SMS wrote
Sounds like lawnmower gas by now.
agreed
I need a siphon tube now. The older Z's had a drain plug, but after crawling around under there today, turns out mine does not.
I'm really not looking forward to a mouth full of gas.
Posted by ZUL8TR, Apr 14, 2011 at 6:39 am
Anyone tired adding Seafom to a tank that has been sitting for some time? Wondering if that and topping off with fresh fuel would be OK?
Remember the engine was rebuilt just prior to it sitting for this project.
Remember the engine was rebuilt just prior to it sitting for this project.
Posted by ZUL8TR, Apr 14, 2011 at 6:21 am
Almost to the final installment of this thread. Put the exhaust in this AM. Here're the pics:
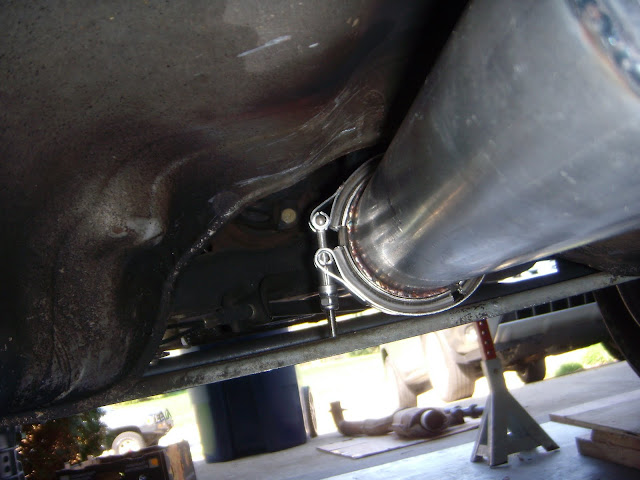
Downpipe from above, but you ca see the exhaust connected to it in this one.
and from below


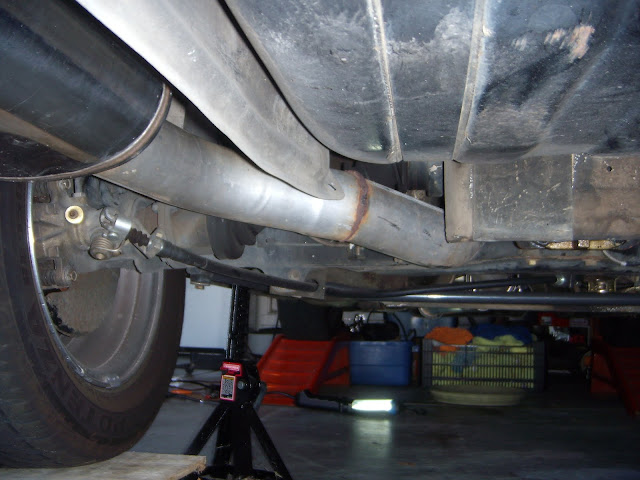
The center section where the CAT would normally live. Looking toward rear of car.

Center section looking back toward front. I was holding off welding on hangers for this until I knew it all lined up perfectly, so ignore the t-bolt clamp holding it to the brackets. Minor detail at this point.


Rear section. This was part of my 3" CAT back set-up where I paid a "professional". Personally, I think the part I did came out a heck of a lot nicer and for less $$$.
And finally a shot from the back. The exhaust is hanging straight and level. Whew...

Final step is to recharge the battery and decide if I'm going to drain the tank after sitting since June 2009, or roll the dice and hope all is well with the fuel. I was bummed to find that the ZXT tank doesn't have a drain plug on it. I really don't want to drop the tank. I need to get the battery charged to see how much fuel is still in the tank, then decide what to do.
Downpipe from above, but you ca see the exhaust connected to it in this one.
and from below
The center section where the CAT would normally live. Looking toward rear of car.
Center section looking back toward front. I was holding off welding on hangers for this until I knew it all lined up perfectly, so ignore the t-bolt clamp holding it to the brackets. Minor detail at this point.
Rear section. This was part of my 3" CAT back set-up where I paid a "professional". Personally, I think the part I did came out a heck of a lot nicer and for less $$$.
And finally a shot from the back. The exhaust is hanging straight and level. Whew...
Final step is to recharge the battery and decide if I'm going to drain the tank after sitting since June 2009, or roll the dice and hope all is well with the fuel. I was bummed to find that the ZXT tank doesn't have a drain plug on it. I really don't want to drop the tank. I need to get the battery charged to see how much fuel is still in the tank, then decide what to do.
Posted by ZUL8TR, Apr 13, 2011 at 6:01 pm
Time for more pics and update.
Outside of attaching a heat shield under the hood and charging the battery, I could officially close the hood and call that portion done.
All the plumbing I needed to work out is finished and installed. Here's some pics:
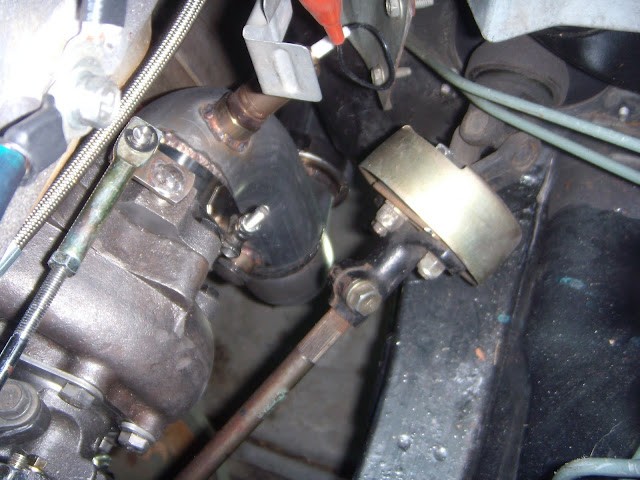
Here's the downpipe with the O2 installed. You can see where the stainless braided oil feed line attaches to the turbo via an -AN fitting. You can also see on the left side of the downpipe, the plug attached where the future wideband O2 sensor will go.

This is the block-off plate where I removed the EGR valve. I also removed the Vacuum Control Module and bypassed it via a fitting directly from the air feed after the air flow meter to the ACC valve that handles the engine idle.

The next pics show the intercooler (IC) piping that leads from the turbo to the IC. The hump connectors can accommodate the rocking of the motor and prevent the piping from coming apart.


After I got the IC pipe above installed, I needed to attach the Air flow Meter to the turbo inlet. I needed to accomodate three vacuum lines in this. One feeds the ACC valve that handles idle, a second attaches to the valve cover, and the third goes to the fuel charcoal cannister. The first pic shows the 3" stainless pipe with fittings welded in place. these can later be plugged when I replace the stock electronic Computer unit with a custom MegaSquirt & Spark engine management system.


Tomorrow, I hope to install the 3" mandrel exhaust, which is completed, just needs to be bolted into place. After that, just recharge the battery and turn the key.
Outside of attaching a heat shield under the hood and charging the battery, I could officially close the hood and call that portion done.
All the plumbing I needed to work out is finished and installed. Here's some pics:
Here's the downpipe with the O2 installed. You can see where the stainless braided oil feed line attaches to the turbo via an -AN fitting. You can also see on the left side of the downpipe, the plug attached where the future wideband O2 sensor will go.
This is the block-off plate where I removed the EGR valve. I also removed the Vacuum Control Module and bypassed it via a fitting directly from the air feed after the air flow meter to the ACC valve that handles the engine idle.
The next pics show the intercooler (IC) piping that leads from the turbo to the IC. The hump connectors can accommodate the rocking of the motor and prevent the piping from coming apart.
After I got the IC pipe above installed, I needed to attach the Air flow Meter to the turbo inlet. I needed to accomodate three vacuum lines in this. One feeds the ACC valve that handles idle, a second attaches to the valve cover, and the third goes to the fuel charcoal cannister. The first pic shows the 3" stainless pipe with fittings welded in place. these can later be plugged when I replace the stock electronic Computer unit with a custom MegaSquirt & Spark engine management system.
Tomorrow, I hope to install the 3" mandrel exhaust, which is completed, just needs to be bolted into place. After that, just recharge the battery and turn the key.
Posted by ZUL8TR, Apr 7, 2011 at 5:12 pm
Last few pieces to reroute the IC piping arrived today.
My to-do-list is getting very short.
just need to sort out my spacing issue in regards to the AFM to turbo boot where I needed to shorten a tube and move a bung. Once that is done, I charge the battery, drain the gas tank, and fire it up.
So very close....
My to-do-list is getting very short.
just need to sort out my spacing issue in regards to the AFM to turbo boot where I needed to shorten a tube and move a bung. Once that is done, I charge the battery, drain the gas tank, and fire it up.
So very close....